Microsoft Word is one of the most used applications on laptops and computers. MS Word is part of Microsoft’s office suite and it is available on Windows, macOS, and also there are mobile apps on Android and iOS. This is also one of the most commonly used software in the market for editing documents, project reports, and much more. A good document should be presented neatly and to do so, MS Word offers a whole host of features under its belt. Among the many presents, the border is one such thing that will make your document stand out.
Using a border on the Word document is a great way to get attention. Here’s how to add a line, pattern, or custom border to a text box, picture, and more. Also, you can avtivate Windows 10 free – Read More. You can also customize the border on MS word with colours, width, thickness, and more. Let’s take a look at how one can add borders in MS Word on Windows and macOS and along with that, we’ll also take a look at some of the customization options available.
Also Read: Delete a Page in MS Word: How to Remove Blank or Extra Pages from Microsoft Word Document
How to Add Border to a Page in MS Word on Windows
- Open the MS Word document to which you want to add a border
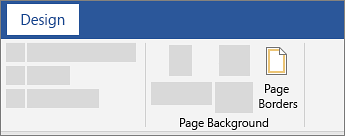
- Go to Design the tab and select the “Page Borders” option on the top right corner
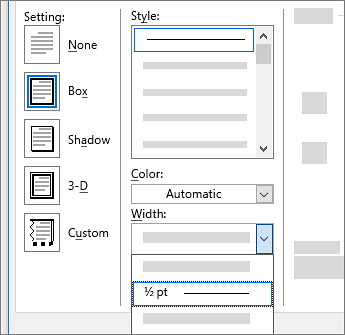
- Under Setting, select any of the options 一 “Box”, “Shadow”, “3D”, “Custom”
- If you are happy with the preview, under Apply to option, select options select the whole document if you want to add a border to the whole document (you can also choose this section, this section – First page only, and This section – All except this page options)
- Once you have made the selection, click OK
Once you have done this, the border which you have selected will be applied to your document.
How to Add Border to a Page in MS Word on macOS
- Open the MS Word document to which you want to add a border
- Go to Design the tab and select the “Page Borders” option on the top right corner
- Under Setting on the left, choose the border style you want
- If you want to remove a border, select None
- Under Style, select the line style you want
- Select the arrow under Color and choose a border colour
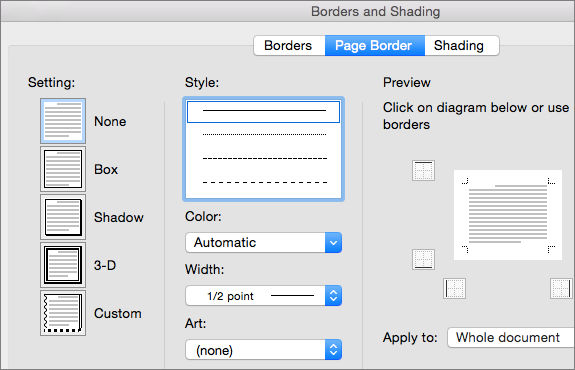
- Select the arrow under Width and choose the width you want
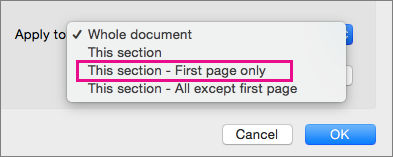
- Select options select the whole document if you want to add a border to the whole document (you can also choose this section, this section – First page only, and This section – All except this page options)
- Check the preview box to confirm your border styles. In case you want to remove the border from one side, select that line in the Preview box
- Once finalized, select OK
Note: All the below-mentioned customization options works on both Windows and macOS. You can follow the below-mentioned steps on both platforms.
How to Add Custom Page Border
- Open the MS Word document to which you want to add a border
- Go to Design the tab and select the “Page Borders” option on the top right corner
- Under the Page Border tab, select the “Custom” option
- Now, you can customize the Style, Color, Width, and Art, check the preview
- If you are happy with the preview, under Apply to option where all you want to apply this border for
- Click OK
How to Add or Remove Border Lines
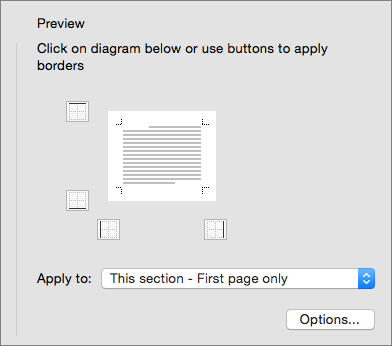
In case you want to add or remove individual border lines from your document, you can do so in the Preview section, which will appear when you are adding a border. If a border is already applied on all four sides, you can remove it from the individual side, you can remove the border lines in the preview section.
In the preview section, there will be four small box icons, you can click on each of them to check the preview and decide which borderline you have to keep or remove.
How to Change Border Width and Color
- Open the MS Word document to which you want to add a border
- Go to Design the tab and select the “Page Borders” option
- Under the Page Border tab, select the “Custom” option
- Now, you can customize the Color and Width
- Click on the down arrow on the Colour, choose the colour you’d like from the pallet and similarly, you can click on the down arrow on the Width option and pick the width you’d like to insert on the page. Make sure to check the preview once you have selected the colour and width
- If you are happy with the preview, under Apply to option where all you want to apply this border for
- Click OK
Also Read: MS Word Shortcut Keys: Full List of Keyboard Shortcuts for Windows 10, 11 and macOS Laptops or PCs
How to Add a Border to Some Text in MS Word
You can also add some border around the text in Microsoft Word. In order to do so, follow these steps:

- Open MS Word on your Windows laptop or macOS computer.
- Select the word, line or paragraph that you want to put a border.
- Go to Home and click on Border to open the border menu.
- Select the type of border you want from the list and click on Okay.
- You can also customise the border by choosing Borders and Shading. Once done, click on Preview to check the border.
- If you are happy with the choice, then simply click on Ok to apply the border around the word, line or paragraph.
FAQs
How do I make a 1-inch border in MS Word?
- Open the MS Word document to which you want to add a 1-inch border
- Click the Layout tab
- Click the Margins button in the Page Setup section of the ribbon
- Click the Normal option
The Normal option will have the top, bottom, left and right border set to 2.54cms, which is 1-inch.
How to add a border in Word online?
MS Word for web does not let you edit, delete, or add new borders to text. However, If you’ve added borders around text in a document you created with the Word desktop app, Word for the web will preserve them.
How to add a border in MS Word mobile app?
MS Word mobile app does not let you edit, delete, or add new borders to text. But, If you’ve added borders around text in a document you created with the Word desktop app, Word for the web will retain them.
How to add a border to a single page?
- Open the MS Word document and place the cursor on the page to which you want to add a border
- Go to Design the tab and select the “Page Borders” option on the top right corner
- Under Setting, select any of the options 一 “Box”, “Shadow”, “3D”, “Custom”
- If you are happy with the preview, under Apply to option, click on the drop-down icon
- Select “This section – First page only”
- Once you have made the selection, click OK
The border will be applied for the single page where you had placed the cursor. For instance, if you had placed the cursor on page 3, the border will be inserted to only page 3.
How to add a picture border in MS Word?
- Choose and Insert the image that you want to add a border to (Insert tab > Picture)
- Once the image is inserted, the “Picture Format” tab will open in the ribbon
- Pick the picture style to insert the border
- To customize more, go to Picture Format > Picture Border
- Choose a colour, effect, and layout you’d like
Also Read:
- PDF Password Unlock: How to Remove Password from PDF File Using Adobe Reader, Small PDF, Google Chrome
- Google Docs Shortcuts: 50 Best Google Docs Keyboard Shortcuts for Windows PC and macOS Laptop
- Google Docs Shortcuts: 50 Best Google Docs Keyboard Shortcuts for Windows PC and macOS Laptop